Email validation in model-driven Power Apps sounds simple at first.
Until real-world users start entering things like:
john@
john@gmail
john@@company.com
test email
And suddenly:
- workflows fail
- notifications never arrive
- integrations break
- automation becomes unreliable
- dirty data spreads across Dataverse
The default validation experience is usually not enough for enterprise scenarios.
Especially when:
- CRM data matters
- automation depends on valid emails
- APIs consume the data
- customer communication relies on it
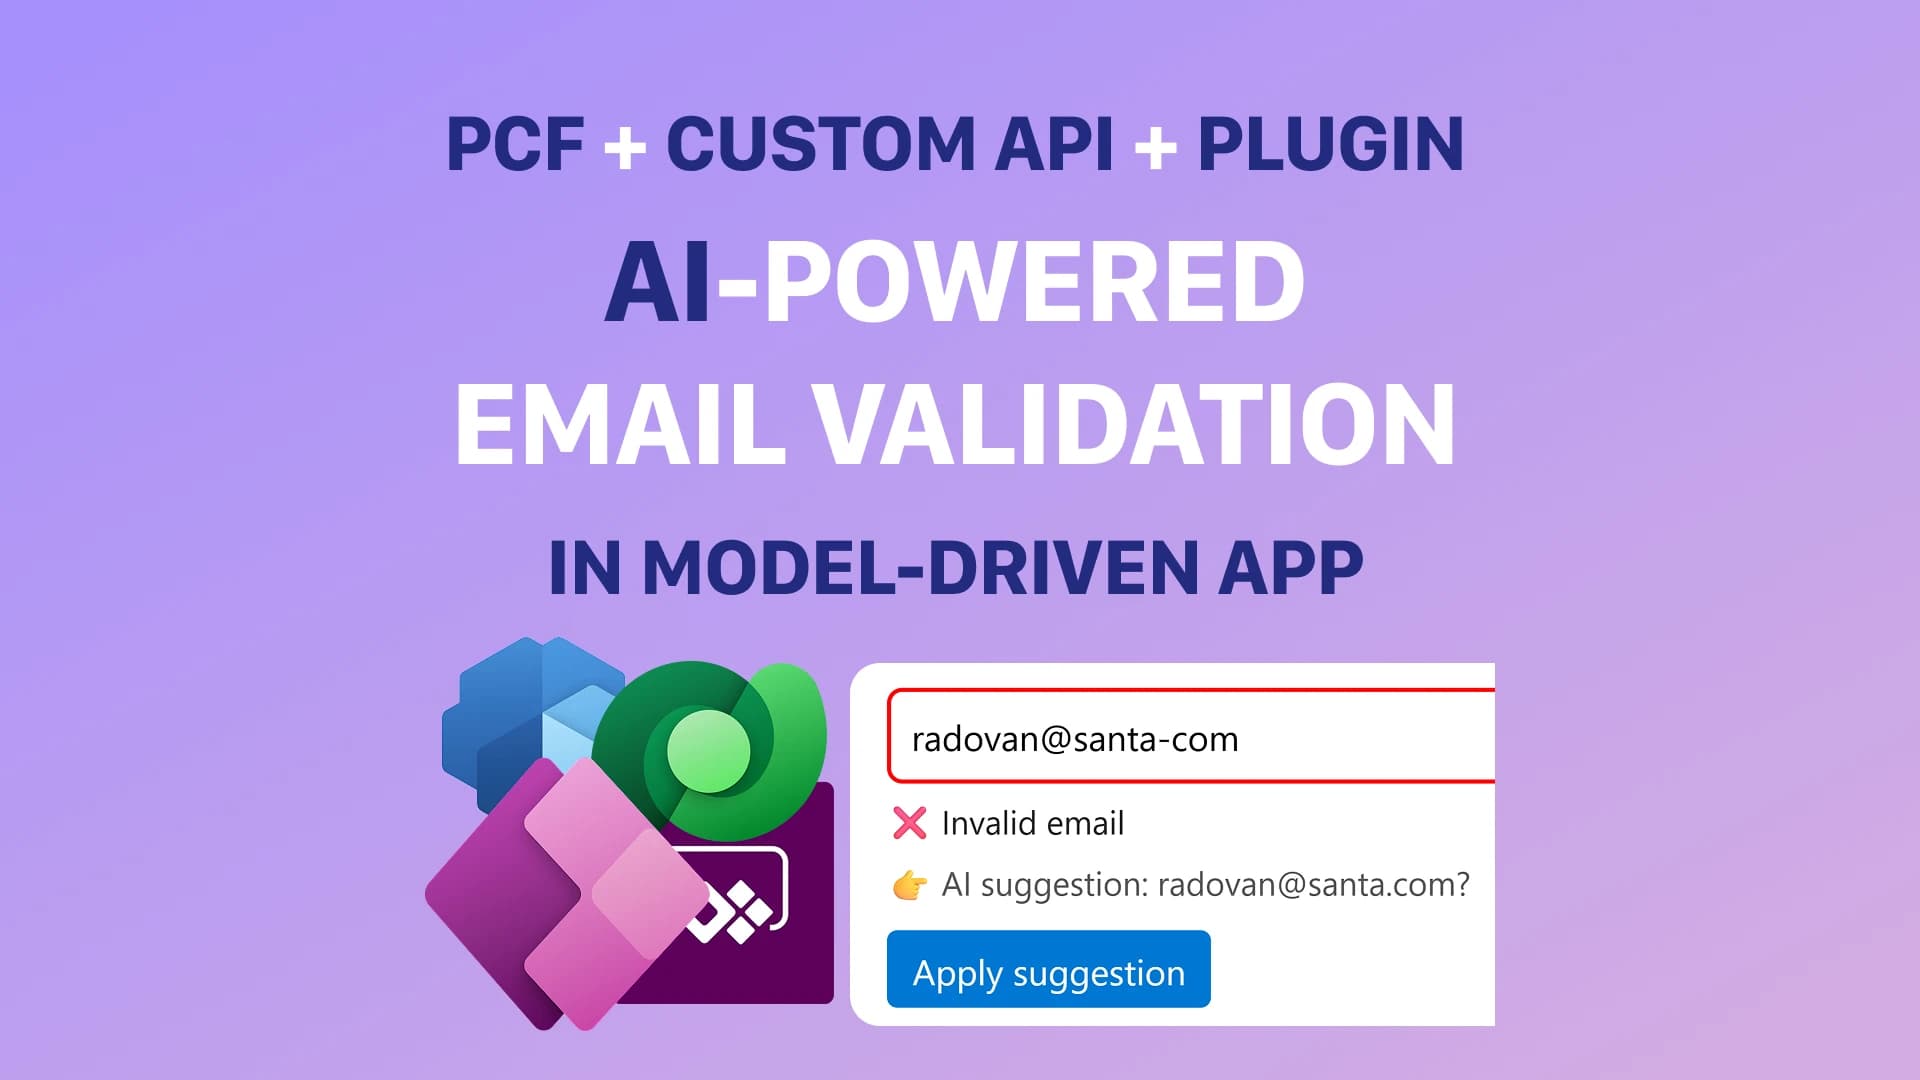
In this guide, you’ll learn how to build AI-powered email validation inside a model-driven Power App using:
- PCF controls
- Dataverse Custom APIs
- C# plugins
- Power Automate
- AI suggestions
The result gives you:
✅ real-time validation
✅ server-side verification
✅ AI-powered correction suggestions
✅ reusable enterprise validation logic
✅ dramatically better data quality
Why Standard Email Validation Is Often Not Enough
Most applications validate emails very superficially.
Usually by checking:
- if @ exists
- if .com exists
- or by using simple regex
Because invalid emails create downstream problems in:
- CRM systems
- ERP integrations
- approval flows
- notifications
- customer communication
- reporting
- automation
And once bad data enters Dataverse: 👉 it spreads everywhere
The Architecture
The solution architecture looks like this:
PCF Control ↓ Dataverse Custom API ↓ C# Plugin ↓ Power Automate / AI ↓ Plugin returns result ↓ PCF displays validation + suggestion
This creates reusable enterprise-grade validation architecture.

Why This Architecture Matters
A common mistake is calling Power Automate directly from a PCF control.
That works for quick demos.
But it also means:
- Power Automate URLs become exposed in browser code
- backend logic becomes fragmented
- security becomes weaker
- governance becomes harder
- logic becomes difficult to reuse
A better enterprise approach is:
- PCF handles UX
- Dataverse handles communication
- Plugin handles validation
- Power Automate handles AI
This separation creates:
✅ cleaner architecture
✅ centralized business logic
✅ reusable backend validation
✅ better security
✅ better maintainability
What We Are Building
The final experience will work like this:
- User enters an email
- PCF detects the value
- User leaves the field
- PCF calls Dataverse Custom API
- Plugin validates email with regex
- Invalid emails trigger Power Automate
- AI suggests a correction
- Plugin returns validation result
- PCF displays suggestion
- User can apply the correction
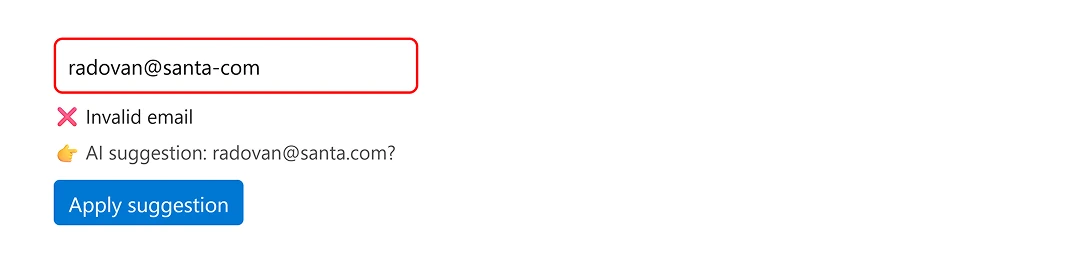
Example:
The system can suggest:
This creates a significantly better user experience compared to only displaying:
Invalid email
Prerequisites
Before starting, make sure you have:
- Power Platform CLI installed
- Node.js installed
- VS Code
- Visual Studio
- Dataverse environment
- Model-driven app
- Table with email column
- Plugin Registration Tool
- Power Automate access
- AI Builder or Azure OpenAI access
Step 1: Create the PCF Control
Open terminal and run:
pac pcf init --namespace SampleNamespace --name SampleControl --template field
Move into the project:
cd SampleControl
Install dependencies:
npm install
Build the project:
npm run build
The most important files are:
- ControlManifest.Input.xml
- index.ts
Step 2: Configure the PCF Manifest
Open:
ControlManifest.Input.xml
Add one bound property:
<property
  name="value"
  display-name-key="Value"
  description-key="Value"
  of-type="SingleLine.Text"
  usage="bound"
  required="true"
/>
This property connects the PCF control to the Dataverse email column.
Next, enable WebAPI support:
<feature-usage>
  <uses-feature name="WebAPI" required="true" />
  <uses-feature name="WebAPI.execute" required="true" />
</feature-usage>
This is required because the PCF will call a Dataverse Custom API.
Step 3: Create the Dataverse Custom API
Go to:
Power Apps Maker Portal → Solutions
Open your solution (if it does not exist create a new one)
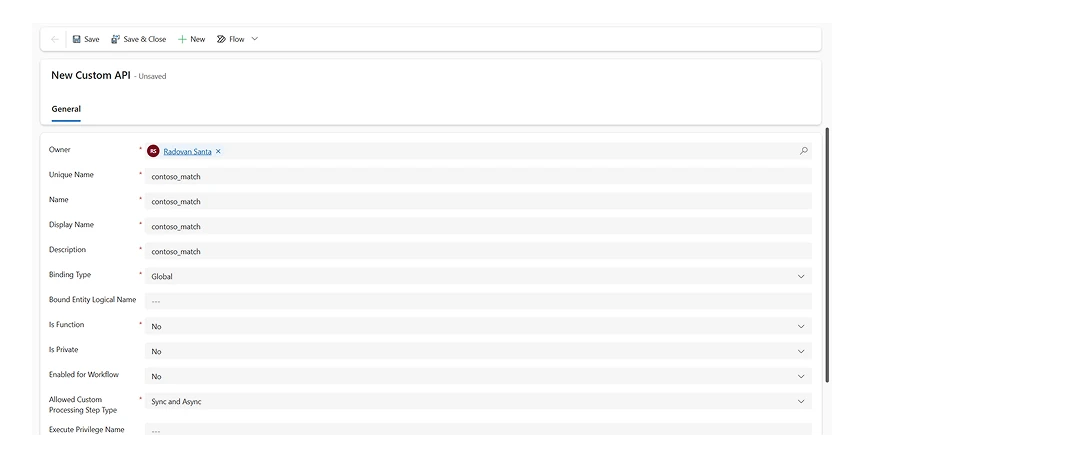
Create Custom API:
New → More → Other → Custom API
Use these values:
Unique Name: contoso_match
Name: contoso_match
Display Name: contoso_match
Description: contoso_match
Binding Type: Global
Is Function: No
Allowed Custom Processing Step Type: Sync and Async
Click Save & Close.
This API will receive Custom API Request Parameters:
- StringIn
- Pattern
And return Custom API Response Properties:
- Matched
- Suggestion
Step 4: Add Custom API Request Parameters
New → More → Other → Custom API Request Parameter
Add the first request parameter:
Custom API: contoso_match
Unique Name: StringIn
Name: StringIn
Display Name: StringIn
Description: StringIn
Type: String
Optional: No
This will contain the email entered by the user.
Click Save & Close.

Repeat the same process for Pattern.
Custom API: contoso_match
Unique Name: Pattern
Name: Pattern
Display Name: Pattern
Description: Pattern
Type: String
Optional: No
This will contain the regex validation pattern.
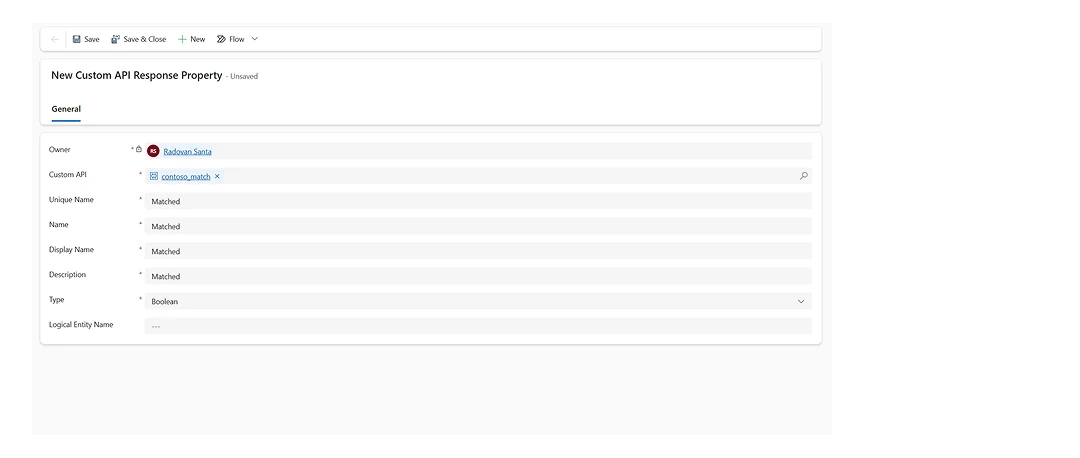
Step 5: Add Custom API Response Properties
New → More → Other → Custom API Response Property
Add the first response property:
Custom API: contoso_match
Unique Name: Matched
Name: Matched
Display Name: Matched
Description: Matched
Type: Boolean
This returns whether the email is valid.
Click Save & Close.
Then add another response property:
Custom API: contoso_match
Unique Name: Suggestion
Name: Suggestion
Display Name: Suggestion
Description: Suggestion
Type: String
This returns the AI suggestion.
Example response:
{
  "Matched": false,
  "Suggestion": "radovan@gmail.com"
}
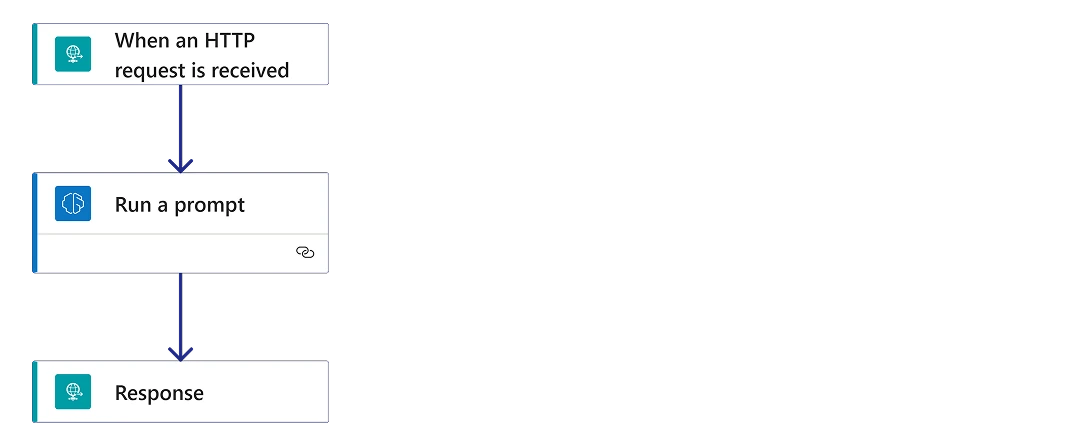
Step 6: Create the Power Automate Flow
Create an instant cloud flow.
Use trigger:
When an HTTP request is received
Inside trigger set Who can trigger the flow? to Anyone.
Use this JSON schema:
{
  "type": "object",
  "properties": {
    "email": {
      "type": "string"
    }
  }
}
Now add your AI action.
You can use:
- AI Builder
- Azure OpenAI
- GPT prompts
- custom AI APIs
Example prompt:
Fix this email if it contains a typo.
Return ONLY the corrected email, nothing else in json format such as
{
  "suggestion": "santa@gmail.com"
}

Email: @{triggerBody()?['email']}
Add a Response action.
Return response.
Example:
{
  "suggestion": "radovan@gmail.com"
}
Save the flow.
Return to Edit mode and copy the generated HTTP POST URL.
Important:
👉 do NOT place this URL inside the PCF code.
The plugin will call it server-side.
Step 7: Create the C# Plugin
Create a plugin project in Visual Studio.
The plugin will:
- Read the email
- Validate regex
- Detect invalid emails
- Call Power Automate
- Return AI suggestion
Open Developer PowerShell for VS

Create new plugin and navigate to the folder:
mkdir EmailValidationPlugin
cd EmailValidationPlugin
Create Class Library project
dotnet new classlib -n CustomAPILab
cd CustomAPILab
Install Dataverse SDK packages
dotnet add package Microsoft.PowerPlatform.Dataverse.Client
dotnet add package Microsoft.CrmSdk.CoreAssemblies
dotnet add package Newtonsoft.Json
dotnet add package System.Net.Http
Open in VS Code:
code .
Replace CustomAPILab.csproj with:
<Project Sdk="Microsoft.NET.Sdk">

  <PropertyGroup>
    <TargetFramework>net462</TargetFramework>
    <LangVersion>latest</LangVersion>
    <SignAssembly>true</SignAssembly>
    <AssemblyOriginatorKeyFile>CustomAPILab.snk</AssemblyOriginatorKeyFile>
  </PropertyGroup>

  <ItemGroup>
    <PackageReference Include="Microsoft.CrmSdk.CoreAssemblies" Version="9.0.2.60" />
    <PackageReference Include="Newtonsoft.Json" Version="13.0.4" />
    <PackageReference Include="System.Net.Http" Version="4.3.4" />
  </ItemGroup>

</Project>
Delete default Class1.cs and create new Plugin1.cs
Copy & Paste this code in Plugin1.cs:
using Microsoft.Xrm.Sdk;
using System;
using System.Net.Http;
using System.Text;
using System.Text.RegularExpressions;
using Newtonsoft.Json.Linq;

namespace CustomAPILab
{
    public class Plugin1 : IPlugin
    {
        private readonly string _secureConfiguration;

        public Plugin1(string unsecureConfiguration, string secureConfiguration)
        {
            _secureConfiguration = secureConfiguration;
        }

        public void Execute(IServiceProvider serviceProvider)
        {
            var context = (IPluginExecutionContext)serviceProvider.GetService(typeof(IPluginExecutionContext));
            var tracingService = (ITracingService)serviceProvider.GetService(typeof(ITracingService));

            string input = context.InputParameters.Contains("StringIn")
                ? context.InputParameters["StringIn"]?.ToString()
                : string.Empty;

            string pattern = context.InputParameters.Contains("Pattern")
                ? context.InputParameters["Pattern"]?.ToString()
                : string.Empty;

            bool matched = Regex.IsMatch(input, pattern);

            context.OutputParameters["Matched"] = matched;

            if (matched)
            {
                context.OutputParameters["Suggestion"] = string.Empty;
                return;
            }

            string suggestion = GetSuggestion(input, tracingService);

            context.OutputParameters["Suggestion"] = suggestion;
        }

        private string GetSuggestion(string email, ITracingService tracingService)
        {
            try
            {
                if (string.IsNullOrWhiteSpace(_secureConfiguration))
                {
                    tracingService.Trace("Power Automate URL is missing in secure configuration.");
                    return string.Empty;
                }

                using (var client = new HttpClient())
                {
                    var json = "{\"email\":\"" + email + "\"}";

                    var content = new StringContent(
                        json,
                        Encoding.UTF8,
                        "application/json"
                    );

                    var response = client.PostAsync(
                        _secureConfiguration,
                        content
                    ).GetAwaiter().GetResult();

                    string responseBody = response.Content
                        .ReadAsStringAsync()
                        .GetAwaiter()
                        .GetResult();

                    tracingService.Trace("Power Automate response: " + responseBody);

                    if (!response.IsSuccessStatusCode)
                    {
                        return string.Empty;
                    }

                    var parsed = JObject.Parse(responseBody);

                    return parsed["suggestion"]?.ToString() ?? string.Empty;
                }
            }
            catch (Exception ex)
            {
                tracingService.Trace("Power Automate suggestion failed: " + ex.Message);
                return string.Empty;
            }
        }
    }
}
What This Plugin Does
This line validates the email:
bool matched = Regex.IsMatch(input, pattern);
Here:
- input contains the user email
- pattern contains the regex pattern
The result becomes:
context.OutputParameters["Matched"] = matched;
If the email is invalid:
string suggestion = GetSuggestion(input);
The plugin then calls Power Automate server-side and retrieves the AI suggestion.
This is significantly safer than exposing Power Automate URLs inside frontend code.
If missing add signing:
sn -k CustomAPILab.snk
Build the project:
dotnet build
Find the DLL in:
bin/Debug/net462/
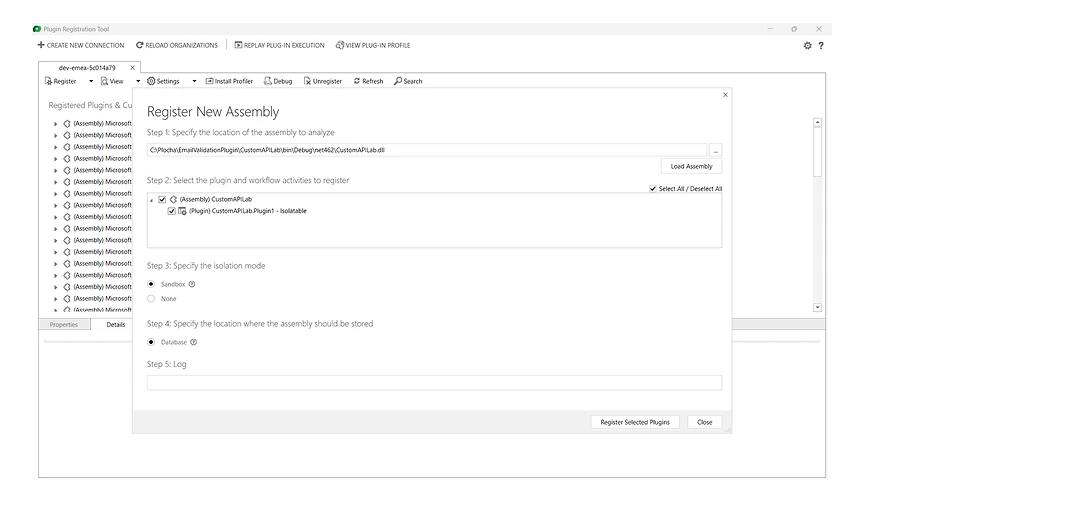
Step 8: Register the Plugin
Open:
Plugin Registration Tool
Navigate to:
Register → Register New Assembly
Register the assembly.
Then register a new step:
Message: contoso_match
Stage: PostOperation
Execution Mode: Synchronous
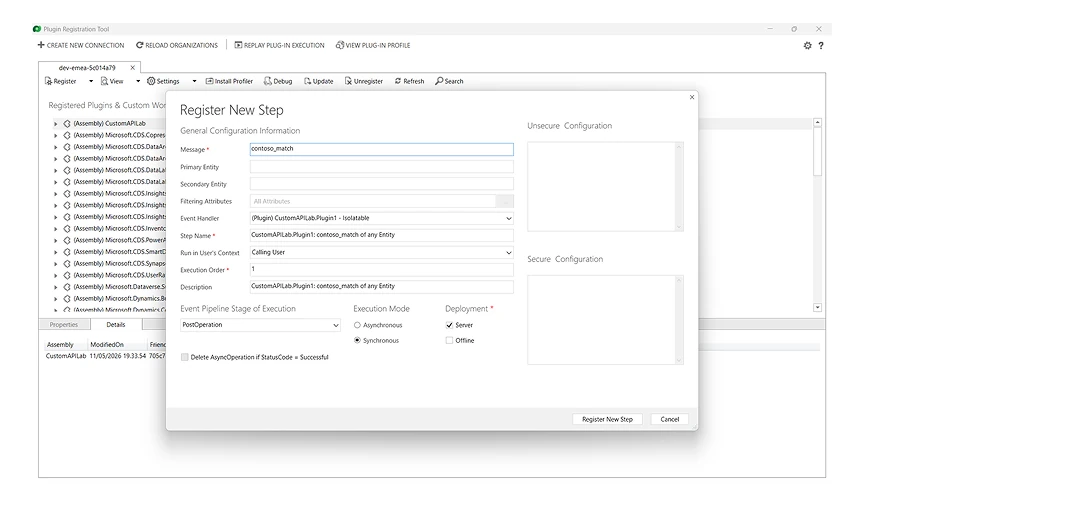
Now open the plugin step.
Add secure configuration:
Power Automate HTTP POST URL
This means the URL remains hidden server-side.
Click update.
Step 9: Create the PCF Code
The PCF control will:
- render the UI
- detect typing
- call Custom API
- display validation
- display AI suggestion
Open already created project from Step 1
Replace index.ts with code:
import { IInputs, IOutputs } from "./generated/ManifestTypes";

interface WebApiWithExecute {
    execute: (request: Record<string, unknown>) => Promise<Response>;
}

interface ValidationResponse {
    Matched?: boolean;
    Suggestion?: string;
}

export class SampleControl implements ComponentFramework.StandardControl<IInputs, IOutputs> {
    private container!: HTMLDivElement;
    private inputElement!: HTMLInputElement;
    private messageElement!: HTMLDivElement;
    private suggestionElement!: HTMLDivElement;
    private applyButton!: HTMLButtonElement;

    private notifyOutputChanged!: () => void;
    private currentValue = "";

    private readonly customApiName = "contoso_match";

    public init(
        context: ComponentFramework.Context<IInputs>,
        notifyOutputChanged: () => void,
        state: ComponentFramework.Dictionary,
        container: HTMLDivElement
    ): void {
        this.container = container;
        this.notifyOutputChanged = notifyOutputChanged;
        this.currentValue = context.parameters.value.raw || "";

        this.container.style.display = "flex";
        this.container.style.flexDirection = "column";
        this.container.style.gap = "6px";

        this.inputElement = document.createElement("input");
        this.inputElement.type = "email";
        this.inputElement.placeholder = "Enter email...";
        this.inputElement.value = this.currentValue;
        this.inputElement.style.padding = "8px";
        this.inputElement.style.borderRadius = "6px";
        this.inputElement.style.border = "1px solid #ccc";
        this.inputElement.style.fontSize = "14px";
        this.inputElement.style.outline = "none";

        this.messageElement = document.createElement("div");
        this.messageElement.style.fontSize = "13px";
        this.messageElement.style.minHeight = "18px";

        this.suggestionElement = document.createElement("div");
        this.suggestionElement.style.fontSize = "13px";
        this.suggestionElement.style.color = "#555";
        this.suggestionElement.style.minHeight = "18px";

        this.applyButton = document.createElement("button");
        this.applyButton.innerText = "Apply suggestion";
        this.applyButton.style.display = "none";
        this.applyButton.style.width = "fit-content";
        this.applyButton.style.marginTop = "4px";
        this.applyButton.style.padding = "6px 10px";
        this.applyButton.style.borderRadius = "4px";
        this.applyButton.style.border = "none";
        this.applyButton.style.background = "#0078d4";
        this.applyButton.style.color = "white";
        this.applyButton.style.cursor = "pointer";

        this.inputElement.addEventListener("input", () => {
            this.currentValue = this.inputElement.value;
            this.notifyOutputChanged();
            this.resetValidation();
            this.resetSuggestion();
        });

        this.inputElement.addEventListener("blur", () => {
            void this.validateEmail(context, this.currentValue);
        });

        this.applyButton.addEventListener("click", () => {
            const suggestion = this.applyButton.getAttribute("data-value");

            if (suggestion) {
                this.inputElement.value = suggestion;
                this.currentValue = suggestion;
                this.notifyOutputChanged();
                this.resetSuggestion();
                void this.validateEmail(context, suggestion);
            }
        });

        this.container.appendChild(this.inputElement);
        this.container.appendChild(this.messageElement);
        this.container.appendChild(this.suggestionElement);
        this.container.appendChild(this.applyButton);
    }

    public updateView(context: ComponentFramework.Context<IInputs>): void {
        const valueFromPowerApps = context.parameters.value.raw || "";

        if (document.activeElement === this.inputElement) {
            return;
        }

        if (valueFromPowerApps !== this.currentValue) {
            this.currentValue = valueFromPowerApps;
            this.inputElement.value = valueFromPowerApps;
        }
    }

    private async validateEmail(
        context: ComponentFramework.Context<IInputs>,
        value: string
    ): Promise<void> {
        if (!value) {
            this.resetValidation();
            this.resetSuggestion();
            return;
        }

        this.showLoading();

        const request = {
            StringIn: value,
            Pattern: "^[^@\\s]+@[^@\\s]+\\.[^@\\s]+$",

            getMetadata: () => ({
                boundParameter: null,
                parameterTypes: {
                    StringIn: {
                        typeName: "Edm.String",
                        structuralProperty: 1
                    },
                    Pattern: {
                        typeName: "Edm.String",
                        structuralProperty: 1
                    }
                },
                operationType: 0,
                operationName: this.customApiName
            })
        };

        try {
            const webApi = context.webAPI as unknown as WebApiWithExecute;
            const response = await webApi.execute(request as Record<string, unknown>);

            if (!response.ok) {
                throw new Error(`Custom API failed with status: ${response.status}`);
            }

            const result = (await response.json()) as ValidationResponse;

            const matched = Boolean(result.Matched);
            const suggestion = result.Suggestion;

            this.showValidation(matched);

            if (!matched && suggestion) {
                this.showSuggestion(suggestion);
            } else {
                this.resetSuggestion();
            }
        } catch (error) {
            console.error("Email validation failed:", error);
            this.showError();
        }
    }

    private showSuggestion(suggestion: string): void {
        this.suggestionElement.innerText = `👉 AI suggestion: ${suggestion}?`;
        this.applyButton.style.display = "inline-block";
        this.applyButton.setAttribute("data-value", suggestion);
    }

    private showLoading(): void {
        this.inputElement.style.border = "2px solid #999";
        this.messageElement.innerText = "Checking...";
    }

    private showValidation(isValid: boolean): void {
        if (isValid) {
            this.inputElement.style.border = "2px solid green";
            this.messageElement.innerText = "✅ Valid email";
        } else {
            this.inputElement.style.border = "2px solid red";
            this.messageElement.innerText = "❌ Invalid email";
        }
    }

    private resetValidation(): void {
        this.inputElement.style.border = "1px solid #ccc";
        this.messageElement.innerText = "";
    }

    private resetSuggestion(): void {
        this.suggestionElement.innerText = "";
        this.applyButton.style.display = "none";
        this.applyButton.removeAttribute("data-value");
    }

    private showError(): void {
        this.inputElement.style.border = "2px solid orange";
        this.messageElement.innerText = "⚠️ Validation failed";
    }

    public getOutputs(): IOutputs {
        return {
            value: this.currentValue
        };
    }

    public destroy(): void {
        // No cleanup needed
    }
}
Understanding the PCF Code
At the top of the file, two interfaces are created:
interface WebApiWithExecute {
    execute: (request: Record<string, unknown>) => Promise<Response>;
}
This allows the control to call:
context.webAPI.execute(...)
which is used to execute the Dataverse Custom API.
Then:
interface ValidationResponse {
    Matched?: boolean;
    Suggestion?: string;
}
defines the response expected from the Custom API.
The plugin returns:
{
  "Matched": false,
  "Suggestion": "radovan@gmail.com"
}
Main Variables
The control stores references to the UI elements:
private inputElement!: HTMLInputElement;
private messageElement!: HTMLDivElement;
private suggestionElement!: HTMLDivElement;
private applyButton!: HTMLButtonElement;
These are used to show:
- the email input
- validation message
- AI suggestion
- apply suggestion button
The current field value is stored here:
private currentValue = "";
And the Custom API name is stored here:
private readonly customApiName = "contoso_match";
This must match the name of your Dataverse Custom API.
init() Method
The init() method runs when the PCF control loads.
It creates the input field:
this.inputElement = document.createElement("input");
this.inputElement.type = "email";
It also creates the validation message, suggestion message and button.
At the end of init(), all elements are added to the control:
this.container.appendChild(this.inputElement);
this.container.appendChild(this.messageElement);
this.container.appendChild(this.suggestionElement);
this.container.appendChild(this.applyButton);
This is what renders the control inside the model-driven app form.
Input Change Event
This part runs every time the user types:
this.inputElement.addEventListener("input", () => {
    this.currentValue = this.inputElement.value;
    this.notifyOutputChanged();
    this.resetValidation();
    this.resetSuggestion();
});
It does four things:
- stores the new value
- tells Power Apps the value changed
- clears old validation messages
- clears old AI suggestions
The important part is:
this.notifyOutputChanged();
This tells Power Apps to read the updated value from getOutputs().
getOutputs()
This method sends the value back to Dataverse:
public getOutputs(): IOutputs {
    return {
        value: this.currentValue
    };
}
The returned property name must match the manifest property:
<property name="value" ... />
Blur Event
Validation is triggered when the user leaves the field:
this.inputElement.addEventListener("blur", () => {
    void this.validateEmail(context, this.currentValue);
});
Using blur is better than validating on every keystroke because it avoids unnecessary backend calls.
The user can finish typing first.
Then validation starts.
validateEmail() Method
This is the most important method in the PCF.
It first checks if the value is empty:
if (!value) {
    this.resetValidation();
    this.resetSuggestion();
    return;
}
Then it shows a loading state:
this.showLoading();
This gives the user immediate feedback:
Checking...
Custom API Request
The request object sends data into the Dataverse Custom API:
const request = {
    StringIn: value,
    Pattern: "^[^@\\s]+@[^@\\s]+\\.[^@\\s]+$",
Here:
- StringIn is the email entered by the user
- Pattern is the regex pattern
- operationName is the Custom API name
This part tells Dataverse how to execute the API:
getMetadata: () => ({
    boundParameter: null,
    parameterTypes: {
        StringIn: {
            typeName: "Edm.String",
            structuralProperty: 1
        },
        Pattern: {
            typeName: "Edm.String",
            structuralProperty: 1
        }
    },
    operationType: 0,
    operationName: this.customApiName
})
Then the PCF executes the API:
const response = await webApi.execute(request as Record<string, unknown>);
Reading the Response
The Custom API returns the plugin output:
const result = (await response.json()) as ValidationResponse;
Then the PCF reads:
const matched = Boolean(result.Matched);
const suggestion = result.Suggestion;
Matched tells whether the email is valid.
Suggestion contains the AI suggestion if the email is invalid.
Showing the Result
This line updates the UI:
this.showValidation(matched);
If valid, the user sees:
✅ Valid email
If invalid, the user sees:
❌ Invalid email
If the backend also returned a suggestion:
if (!matched && suggestion) {
    this.showSuggestion(suggestion);
}
the PCF displays:
👉 AI suggestion: radovan@gmail.com?
Apply Suggestion Button
When the user clicks the button:
this.applyButton.addEventListener("click", () => {
the PCF reads the suggested value:
const suggestion = this.applyButton.getAttribute("data-value");
Then it updates the input:
this.inputElement.value = suggestion;
this.currentValue = suggestion;
this.notifyOutputChanged();
Finally, it validates the corrected email again:
void this.validateEmail(context, suggestion);
This gives the user a smooth correction experience.
Step 10: Build and Package the PCF
Build the PCF project:
npm run build
Create a production build:
npm run clean
npm run build -- --production
Initialize a Dataverse solution project:
pac solution init --publisher-name Contoso --publisher-prefix contoso
Add the PCF project reference:
pac solution add-reference --path ..
Build the final Dataverse solution:
dotnet build
The generated solution ZIP file will appear inside:
bin/Debug/
or:
bin/Release/
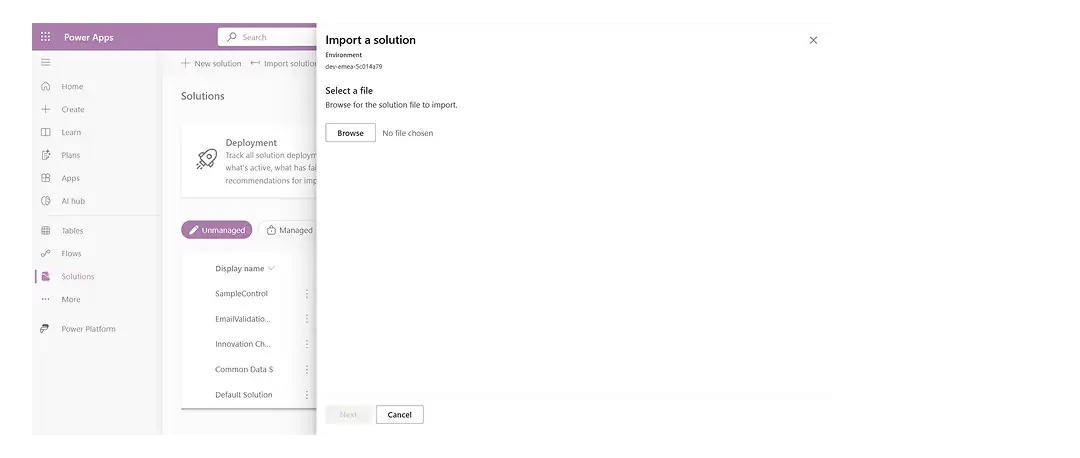
Step 11: Import and Test the Solution
Go to:
Power Apps → Solutions
Click:
Import Solution
Select the generated ZIP file.
After importing:
- Open your table form
- Select the email column
- Click Components
- Add your PCF control
- Save and Publish
Create or open your model-driven app and add the form containing the email field.
Now test emails like:
john@
radovan@gmial.com
test email
The flow will work like this:
- PCF detects the input
- Custom API gets executed
- Plugin validates the regex
- Plugin calls Power Automate
- AI returns a suggestion
- Plugin returns the response
- PCF displays validation and AI suggestion
Example:
❌ Invalid email
👉 AI suggestion: radovan@gmail.com?
When the user clicks:
Apply suggestion
the corrected email is automatically inserted into the field.
Common Mistakes
Some common issues include:
- forgetting WebAPI in manifest
- wrong Custom API name
- mismatched parameter names
- wrong plugin stage
- forgetting to publish customizations
- exposing Power Automate URL in PCF
- invalid JSON response from flow
- testing only in harness
Most issues usually come from one of these areas.
Why This Architecture Is Enterprise-Friendly
This approach creates:
✅ centralized validation
✅ reusable backend logic
✅ secure architecture
✅ AI-assisted correction
✅ cleaner governance
✅ better user experience
Most importantly:
👉 the frontend remains responsible only for UX.
The backend controls the business logic.
That separation matters a lot in enterprise systems.
Best Practices
Keep Validation Server-Side
Frontend improves UX.
Backend protects the system.
You need both.
Keep PCF Focused on UX
PCF should handle:
- rendering
- feedback
- interaction
- suggestion display
The backend should handle:
- rules
- governance
- validation
- AI communication
Do Not Expose Backend URLs
Avoid putting Power Automate URLs into browser-side code.
Use secure plugin configuration instead.
Use AI as Assistance
AI should suggest corrections.
It should not replace deterministic validation.
Final Thoughts
Email validation sounds like a small feature.
But poor email quality can break:
- workflows
- notifications
- approvals
- CRM processes
- integrations
- reporting
- customer communication
By combining:
- PCF
- Dataverse Custom API
- C# plugin
- Power Automate
- AI suggestions
you can build a dramatically more intelligent validation experience inside model-driven Power Apps.
And the most important part is not only the technology.
It is the architecture.
- PCF handles the experience.
- Dataverse handles communication.
- Plugin handles validation.
- Power Automate handles AI.
That is what makes the solution scalable, reusable and enterprise-ready.
The Rule to Remember
Good validation does not only block bad input.
👉 it helps users succeed.
One Honest Question
Would you use AI-powered validation inside your model-driven apps? 👇